Friday, December 24, 2010

Christmas Eve

I'm super excited that it is Christmas Eve because I will soon be able to post some of the lovely items that I made as gifts this Christmas. I didn't get to do us much sewing as last year, but I think the recipients will appreciate what I have created.

Two days ago I made another jaunt to the fabric warehouse in Osan. I could spend hours in that place! Here are some pics of the loot. I need to think of some great ideas for these items.


I think I will use the fabrics below for a new quilt. I will need to start searching for a design to use.

Sunday, November 28, 2010

Where in the World

I know I have been seriously delinquent in keeping up with posting to this blog. Let's just say teaching takes up pretty much my entire life and when I do have time left over I spend it with family and friends, or I'm sewing. Christmas is approaching and I have been having a million ideas running through my head...some of which will be revealed after Christmas. My students were the recipients of personalized pencil cases for their holiday gifts. They really seamed to like them. I'm also excited that students will have a place to store their personal things. I made 21 cases in all.


It is hard to imagine that our Korean Adventure started almost a year ago! I feel like I have much more to explore. With that, I feel a resolution should be made to keep up with my blog a little more. We can only wait and see how that goes!

P.S. I'm loving these. Hint, hint. ;-)

Sunday, August 29, 2010

Back To School


I've been busy getting my classroom together. I did a few sewing projects to get my room started. My photos don't seem to want to upload, so made a collage. Feel free to check them out larger on my Flickr.

Sunday, July 11, 2010

Work in Progress

This weekend was spent shopping for fabric in Osan and working on my pink, orange and green quilt. I went with several ladies to the Happy Quilt Warehouse to purchase fabric. We did have a goal in mind as the evening sewing group is going to work on a sampler quilt. I wasn't really sure if I would participate, but I figured...why not?!I finally decided on doing a disappearing nine-patch. I don't know if I'm doing it exactly how it is meant to be done, but I'm making it how I want it. So far I like how it is turning out. I also picked up some really cute Halloween Fabric designed by Riley Blake. I think I may make some household things with it and maybe not a quilt. It was just too cute to pass up.
I'm happy my classes are over and I'm having a chance to do some sewing before the school year starts... Yes, I got a teaching job! I'm so relieved and happy.

Sunday, June 20, 2010

Road Trip

My DH and I took a little road adventure today down to Osan, and he was nice enough to make a detour to the fabric warehouse. I could have spent hours there looking through all the pallets of fabric, but I knew I was on a time crunch. I was able to find some more fabrics for a project I want to start working on with pink, green, orange, yellow and cream. Here's the loot!Here is the stash for the next project. I may not include them all. I'm still trying to figure out what design I want to create. I just really like these colors together.

Tuesday, June 15, 2010

Boring to Styling

I know I've been MIA for awhile, but things have been very busy here, so I haven't been able to do much sewing. I'm working full time again and taking graduate classes, so once my day is done I'm ready to get to sleep! Yesterday I finally took on jazzing up my camera strap with this quick little tutorial. I put thin batting inside my strap too add a little cushion. I love how it turned out!

Boring:
Styling:

Tuesday, May 11, 2010

The Loot

I was able to slip away during my lunch hour at work today to make some purchases. The "Happy Quilt" man was set up in the on post hotel for the morning. Here is my loot!
I'm loving the availability of all the Riley Blake fabrics. I think it pink, peach, white and orange quilt may be in the mix. I'm getting spoiled. I won't know what 'real' fabric prices are like after our tour here.

Again, would you eat this?
Yes, he did eat the fish. Don't worry - not the whole fish, but still...Yummy?!

Sunday, May 9, 2010

Sneak Peek

Here are some things I've been working on.
Some Accent Pillows that Match the Krazy Quilt
Black, White, Grey & Aqua String QuiltRoar! Dinosaur Baby Blanket

Saturday, April 17, 2010

Would you eat this?

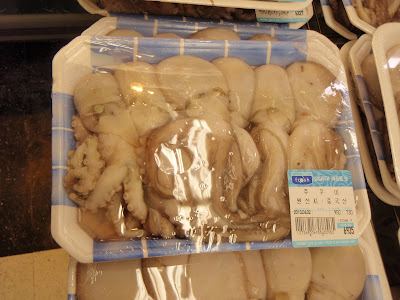
Last week I went to the local 'Super-Target' style store, Emart. My friend and I loved walking around the grocery area and trying all different kinds of things. We didn't know what a lot of it was, but it was delicious. We came across some interesting things, that I would like to play a game..would you eat this?
Large squid? I have eaten a lot of smaller pieces, but this kind of scares me.
A whole fish. I'm not really a "fishy" person. I like shell fish and some mild fish. Seeing the whole fish packaged up and ready to take home is I think what caught my eye.
Large suction cups? Again, I think this one is the size issue. Each of those suction cups was more than 1/2 inch wide.
What in the world are these? They have spikes!
Shrimp tale surprise! These were delicious. I grabbed two to take home. It was kind of like shrimp in a roll.
Doesn't it look great! I"m not a huge fan of raw sushi, but my DH loves it. I haven't seen sushi this beautiful in the US.
YUMMY! Now these I can handle. Already cooked too! Time for some dinner!

Sunday, April 11, 2010

Kwik Crazy Quilt

It's finally finished!
I was able to get an appointment with the long arm to quilt my first quilt on the long arm. I chose a playful paisley quilt design.
I love that I get to learn how to use the long arm and quilt it myself. It's such a great machine...now if I only had an extra $50,000 to have one of my own!!
I also made an Easter basket for a new friend. I may be teaching a class on how to make this basket since many people at the quilting group would like to make them.

Sunday, March 28, 2010

Fabric Easter Baskets Tutorial

I made fabric easter baskets this weekend for my husband and I. I just couldn't buy one when I knew I could create something with fabric. I searched the internet looking for a pattern or tutorial already figured out for me, but I didn't see anything I liked. This is what I came up with. Please feel free to use this tutorial for personal use.

This will be my first tutorial, so you will need to let me if you can follow it!
Materials Needed:

30 coordinating 3" squares (I used 4 coordinating fabrics)
1pc 13"x9" denim or choice of fabric for basket bottom
1 pc 2" x 18" denim for strap lining
2pc lining fabric 10.5" x 13" for the inside of the basket
1 pc batting 13" x 24"
2 pc medium weight iron on interfacing 10.5" x 13"
1 pc medium weight iron on interfacing 1.5" x 18"

Step 1 Cut all Fabric Pieces to Size and arrange the 3" squares into 2 sets of 3 rows of 5 squares. The squares can be arranged in any manner you choose. Sew 2 sets of square patchwork together using a 1/4" seam. Press seams to one side.

Step 2 Sew the 2 square patchwork sets to the bottom piece of 9"x13" denim fabric.
Step 3 Put the batting under the set and "stitch in the ditch" along the seam that separates the patchwork squares and the denim.

Step 4 I added top stitching on all sides of the squares. This step is optional, but I liked the look and the way it kept the layers together.
Step 5 Fold the patchwork in half with right sides together and sew along both sides. (Fold so that the piece is folded to 13" wide x 12" tall. See step 6 picture) I use pins to make sure all the seams line up and match.

Step 6 Now for the fun part! Cut off 2" from the top of the basket. The remaining piece that you just sewed together should be 10" tall. The piece you cut off will be your basket handle. (If you aren't too precise with your 1/4" seam allowance make the piece you cut off a little smaller. The remaining piece needs to be 10".)

Note: The piece you cut off may be a little 'wobbly' just square it off. You will need to cut one of the side seams to make the piece into a strap. The side seam will also be missing the decorative stitching if you chose to do it, so add the two little stitches if you desire.

Step 7 Box the corners of the patchwork. Measuring 3" up from the corner, making the basket 6" deep. I do not trim the access corner pieces because these pieces help the basket stand. Set to the side.
This is a picture of boxing the lining. I forgot to take a picture of boxing the patchwork, but the process is the same.

Step 8 Lining: Iron the interfacing to the wrong sides of both lining pieces. Sew around three sides of the lining leaving a generous opening on the bottom of the lining. Leave the top (13" wide section) open. You could use 1 pc of lining and leave a hole on the side. I used 2 pieces because my fabric was directional and I wanted everything going in the same direction. I also prefer to turn items through a hole on the bottom rather than the side.
Step 9 Box the corners of the lining using the same measurements as the patchwork. Set to the side.

Step 10 Now let's make the handle. Taking the patchwork piece you cut off, iron a 1/4" seam allowance on one of the long sides of the strap.
Step 11 Iron on the 1.5" x 18" pc of interfacing to the center of the wrong side of the 2"x18" pc of denim. Iron 1/4" seam allowance on the denim handle as well.

Step 12 With right sides together sew down the side of the handle that does not have the seam pressed.

Step 13 Press the handle so that the right sides are out. Sew down the long open side of the handle with coordinating thread. I also top stitched multiple lines down the handle. These are optional.
Step 14 Pin right sides of the basket handle to the patchwork sides.
Step 15 Pin right sides of all the basket layers together. Sew around the top edge of the basket with 1/4" seam allowance.
Step 16 Pull the basket right side out.
Step 17 Push the lining into the basket. Iron and then top stitch around the entire basket. Hand stitch the hole in the bottom of the basket closed.
Step 18 All done!

I added personalization to these baskets. If you would like to do the same...it is easiest if added after Step 4.

Friday, March 19, 2010

Getting it Together

I'm almost a freak about organization. I love everything to have its own spot and also be aesthetically pleasing. Living in an apartment with no attic to hide stuff has given me new organizational challenges. Thankfully our apartment has tons of closets, but there are some things that are better stored...under the bed!

Because I couldn't find them anywhere in Korea, I ordered adjustable bed risers from Walmart.com. I got the adjustable ones so I could choose how high I wanted the bed. An extra 3", 5" or 8". I'm a woman after all and changing my mind about things is what I'm allowed to do! Either way, after ordering these things over a month ago they finally arrived!

I started with our master bedroom.

Ahhh...all that extra under bed storage bliss. But, eww! The sheet is hanging out and you can see all the *crap* underneath. Time to make a bedskirt! Rather a faux bedskirt because there is no way I'm lifting the tempurpedic mattress myself. I love the bed, but it's a pain to lift.

I wanted to make the bedskirt tailored to the bed with straight lines. No ruffles. No pleats. Here is the end piece.
Now for the rest of the bedskirt.

Much better! I haven't decided it I want to put some trim on the skirt to add some visual interest. I also need to make some more decorative pillows to tie all the colors of the bed together. Right now it's a bit too neutral. I am also on the hunt for a night stand for the far side of the bed. Right now it's just some simple shelves that were shipped to Korea by mistake. I had seen a beautiful blue cabinet that I hope to find again.

At least for now I can hide the under bed storage!

Thursday, March 18, 2010

No Teaching Today

I've been busy for the first three days of this work week subbing for first grade. The teacher was feeling a bit better, so I get to sew today because I didn't get called in to work. I've been working on a Bags From The Heart order and I finished it this morning.
I love the fabric that was used for the lining, side panels and accents. It is Vera Bradley Bali Blue. One advantage to living in Korea is that I can actually buy these fabrics by the yard! In the US, I would have to scavenger hunt the web to see who would send it to me - at a much higher cost too! Here are two pictures of the inside. The inside has three slide pockets on both sides and one of the ends has three pen pockets. Isn't this fabric wonderful?
Three Slide Pockets (above) Pen Pockets (below)
I truly believe a bag needs to have pockets on the inside to keep all your stuff organized. I always find it a pain when you can't find your cell phone in your purse when it is ringing. When I design my bags I try to maintain functionality.

Finally, here is a picture of the back. I stippled all over the exterior. I love the look it gives a somewhat plain uniform. I used beautiful blue thread for the stitching.